TL/DR: I present a detailed how-to for deploying a (hello world) Node.js web application (in container image form) onto AWS Fargate with auto-scaling. This could be useful for the start of your project and then add subsequent layers for your purposes, or bits and pieces of this how-to could help solve a particular problem you’re facing.
Motivation and Background
It is not enough to be able to write software. One must also be able to deploy. I’m reminded of the Steve Jobs quote, “real artists ship.” Even if you wrote the next killer social media website, it means nothing unless you can get it out the door, hosted, and in a stable (and scalable!) production environment. This post is an extracted walk-through of how I used the new AWS service Fargate to host a side project.
What is Fargate? It’s a generalized container orchestration service. “Generalized” here means that AWS has taken care of the underlying infrastructure usually associated with the creation of a ‘cluster’ (in the kubernetes sense) of computing resources. Bring your own container (the portable form of your application) and through configuration in the AWS console the application can be deployed into an auto scaling cluster, with integrations for Application Load Balancing, Certificate Management (ACM) for HTTPS, and DNS (Route 53). And what’s really nice is the container can be given an IAM role to call other authorized AWS Services.
Here’s the user story for this article, to help bridge the developer and product owner / business gap:
As an application/DevOps engineer, I want to deploy my containerized application to an orchestration service (AWS Fargate), so that I can avoid the headaches and complexity of provisioning low level services (networking, virtual machines, kubernetes) and also gain auto scalability for my production/other environment.
– an application/DevOps engineer
The Big Picture
From the Node.js source all the way to a live app, here’s how the pieces fit together in one picture. (The draw.io file is included in my github repo.)

Node.JS Web App
A very basic ‘hello world’ app can be pulled from my github repo:
git clone \
https://github.com/yamor/nodejs_hello_world_dockered.git && \
cd nodejs_hello_world_dockered && \
npm install

# Give it a go and run
npm start
# ... then access at localhost:3000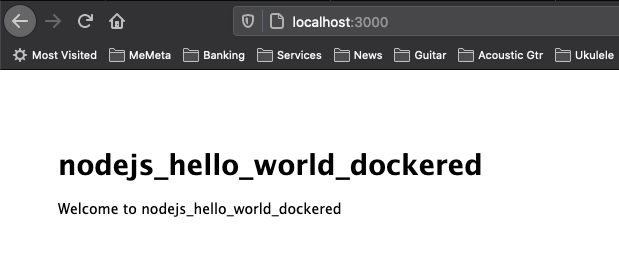
It’s a very basic application:
- Built from
npx express-generator - Changed the
routes/index.js‘title’ variable to ‘nodejs_hello_world_dockered’ - Added a
Dockerfile, which we’ll walk through now…
Dockerfile
$ cat Dockerfile
 FROM node:12.18.2-alpine3.9
 WORKDIR /usr/app
 COPY . .
 RUN npm install --quiet
 RUN npm install pm2 -g
 EXPOSE 3000
 CMD ["pm2-runtime", "start", "./bin/www", "--name", "nodejs_hello_world_dockered"]
Some explanation:
- The
COPYcommand is copying all the Node.js source into the container pm2is installed for process management, reload capabilities, and it’s nice for production purposes adding a layer on top of the core Node.js code, and not necessary for small development efforts. But importantly, the container is usingpm2-runtimewhich is needed to keep a container alive.
Docker Commands
Assumption: docker is installed and running.
$ docker -v
Docker version 19.03.6-ce, build 369ce74
Docker build, run then a curl to test.
# this command builds the image that is ultimately
# deployed to fargate
docker build -t nodejs_hello_world_dockered .

docker run -d -p 3000:3000 nodejs_hello_world_dockered

$ curl localhost:3000
<!DOCTYPE html><html><head><title>nodejs_hello_world_dockered</title><link rel="stylesheet" href="/stylesheets/style.css"></head><body><h1>nodejs_hello_world_dockered</h1><p>Welcome to nodejs_hello_world_dockered</p></body></html>
When done, kill the running container but keep the image.
# kills all running containers
docker container kill $(docker ps -q)

# you should see our nodejs_hello_world_dockered
docker images
Push the Image to a Container Registry
Tip: Use an EC2 or Devops/pipeline within AWS (and not your local machine) for image building and pushing, as uploads from a slow or residential network can take a long time. Take proximity into account for your approach/strategy for large data movements. This tip should have preceded the Docker section above, but the rationale might not have become apparent until you attempt to push an image to a registry and find that it’s way too slow.
Assumption: the AWS CLI is installed and has an account with appropriate authorizations.
$ aws --v
aws-cli/1.16.30 ...Assumption: you have an ECR repository created.
Now to push and it’s just two commands (but preceded by an AWS ECR login), to label the image then upload it. Notice the label contains the repositories address.
aws ecr get-login --no-include-email --region us-east-1 \
| /bin/bash

docker tag nodejs_hello_world_dockered:latest \
1234567890.dkr.ecr.us-east-1.amazonaws.com/fargate_demo:latest

docker push \
1234567890.dkr.ecr.us-east-1.amazonaws.com/fargate_demo:latest
AWS & Fargate
Congratulations, at this point the application is in a nice and portable (container) format and residing in an AWS ECR repository. The Fargate configuration will consist of the following:
- Task: defines the container configuration
- Cluster: regional grouping of computing resource
- Service: a scheduler which maintains the running Task(s) within the Cluster…
- Auto-scaling will be configured at this level of the stack and will scale up the number of Tasks as configured
The remaining AWS service is a Load Balancer which is separate from Fargate. It will be described later as it exposes the application to the greater web.
Task Definition
Access the AWS Console > (ECS) Elastic Container Service > (left side menu) Task Definitions > click ‘Create new Task Definition’. On the next screen click ‘Fargate’ and then ‘Next Step’.

On the next screen, fill in the following:
- Name: I have called it ‘fargate-demo-task-definition’
- Task Role: this can be left as ‘none’, but I can’t stress enough how versatile this is. If your Node.js app needs to make call to DynamoDB, Simple Email Service, or any other Amazon service, you can enable it here. Using the node package
aws-sdkwill automagically query a resource URI at runtime to gain credentials, thus granting authorizations to your app for the role specified. This is very cool. - Task Execution IAM Role: leave as the default ‘ecsTaskExecutionRole’, see the image below for the succinct AWS explanation
- Task Size: this provides a lot of room for tuning, but for this simple Node.js app I’ve plugged in 0.5GB and 0.25CPU respectively for memory and CPU allocation.
- Add Container:
- Container Name: I have called it ‘fargate-demo-container-image’
- Image: Use the image URI from the end of the ‘Upload to Container Registry Section’ which was of the form ‘1234567890.dkr.ecr.us-east-1.amazonaws.com/fargate_demo:latest’
- Memory Limits: AWS recommends 300MiB to start for web apps.
- Port Mappings: 3000, for the container port exposing the Node.js application.
- …then click ‘Add’.
- Tags: always try to tag your AWS resources.
- …then click ‘Create’.
Cluster
Access AWS ECS and click ‘Create Cluster’.

There are a lot of different configurations for computing resources, networking, and scaling but we’ll stick with the simple case and select Networking Only.

On the next screen, give it a name such as ‘fargate-demo-cluster’. Leave the ‘Create VPC’ unchecked as we can use the default one but if you’re deploying an intensive app you may want a dedicated VPC. Add any tags. (I highly recommend adding tags so you can quickly search and find associated resources for your projects.)
ALB – Application Load Balancer
Access the ALB service and click ‘Create’: EC2 > (left side menu) Load Balancers > ‘Create’ > (Application Load Balancer / HTTP / HTTPS) ‘Create’.
On the next configuration screen, make the following changes:
- Name: I have called it ‘fargate-demo-ALB’
- Listeners: for now we’ll keep HTTP port 80, though this target group will be deleted eventually. (The ALB creation wizard requires at least one target group.)
- (Not included in this article, but once the entire system is up it’s easy to add a second listener for HTTPS port 443 while also including a certificate from ACM.)
- Availability Zones: choose the intended VPC and select multiple subnets which will eventually become contain the targets for this ALB
Click ‘Next: Configure Security Groups’, though an intermediary page will warn about the absence of a ‘secure listener’. We’ll click through this for now, but as mentioned above a 443 listener can be added in the future (but not part of this article).
On the next page, we’ll ‘Create New Security Group’ and call it ‘fargate-demo-security-group’. Leave the default TCP port of 80, and notice that it’s open to any IP source (0.0.0.0/0, ::/0). Then click ‘Next: Configure Routing’.
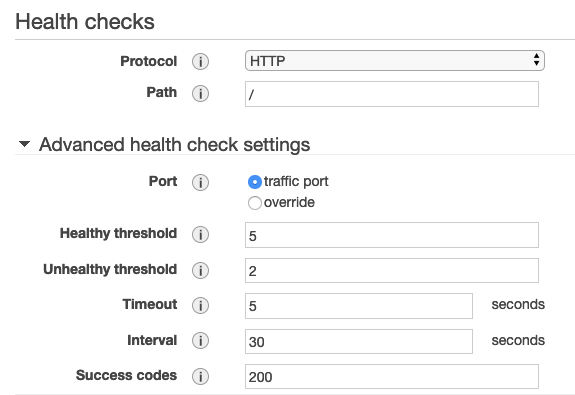
On this next page, give the target group a name (fargate-demo-target-group). In the screengrab below, it’s important to understand that the ALB will regularly check for the application providing an HTTP status code 200 at the specified path. The Node.js app was created to offer a basic response on the root path so the following configuration is fine.
Click ‘Next: Register Targets’, but we’ll skip that page and click ‘Next: Review’ then ‘Create’!
Service
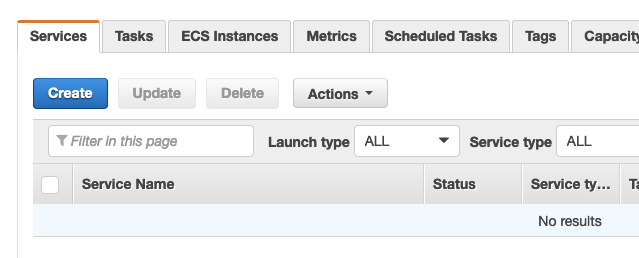
The Fargate Service will provide an instance of the Task Definition to be run in the Cluster. Navigate to AWS Console > ECS > (left side menu) Clusters > then click on the Cluster we created “fargate-demo-cluster”. And at the bottom of the screen will be a tag for ‘Services’, click the button ‘Create’.
On the next page fill in the following info:
- Launch type: Fargate
- Task Definition: pull down the menu and you will see our previously configured ‘fargate-demo-task-definition’. As you upload more revisions to this ECR repository, the revision numbers will increase.
- Cluster: pull down the menu and find the ‘fargate-demo-cluster’ created previously.
- Service Name: I have entered “fargate-demo-service”
- Number of Tasks: enter ‘1’ for this demo. You may wish to increase this depending on your application.
- Tags: always be tagging!
- … click ‘Next Step’.

On the next page, edit the following:
- Cluster VPC + Subnets: It’s important to select your target VPC here, which will probably be your default. But it needs to be the same as where the ALB was created earlier in this article, also select the same subnets.
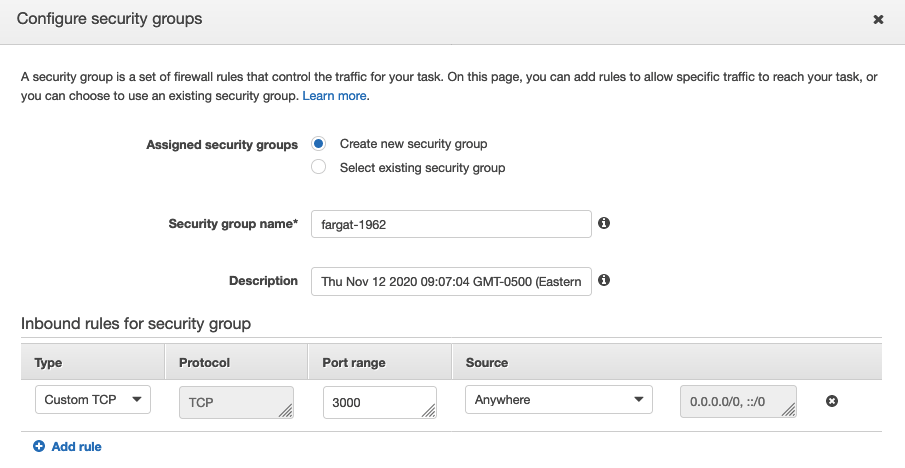
- Security Groups: click ‘Edit’ and add a Custom TCP with port 3000, and then delete the HTTP with port 80 (as this won’t be used). The 3000 corresponds to the container’s externalized port.
- (See Figure 9 below.)
- … click “Save”
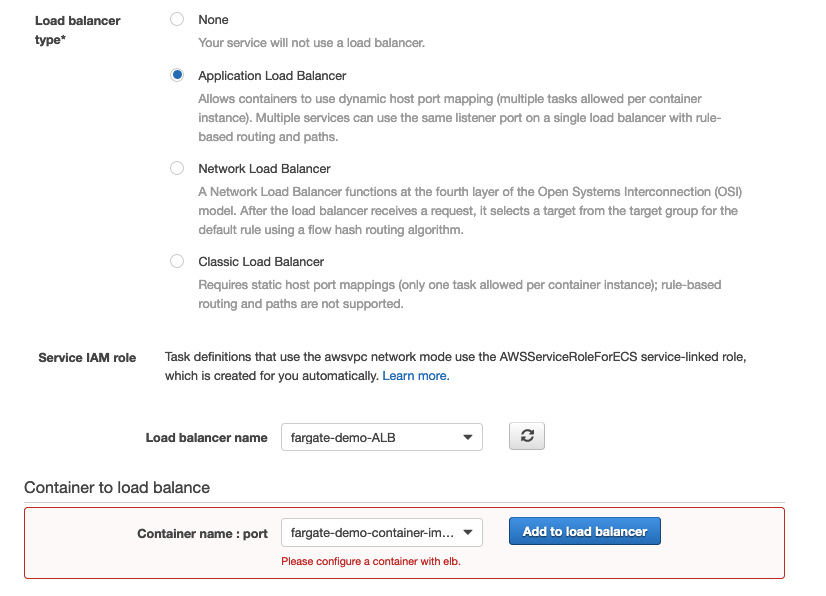
- Load Balancer Type: select the radio button for “Application Load Balancer”, which will then display a pulldown where we can select the “fargate-demo-ALB” we had created earlier.
- Container to Load Balance: pull down this menu to select the “fargate-demo-container-image” and click “Add to Load Balancer” and this will change the wizard’s form.
- (See Figure 10 below.)
- In the updated form, modify the following:
- Production Listener Port: change to 80:HTTP, this is the listener originally created during ALB creation.
- Path Pattern & Execution Order: set to ‘
/’ and ‘1’ respectively, this will enable the ALB to forward base path requests to the application. - Health check path: also set to ‘
/’, to ensure the Fargate Service doesn’t incorrectly infer that your app needs to be restarted.
- … click “Next Step”
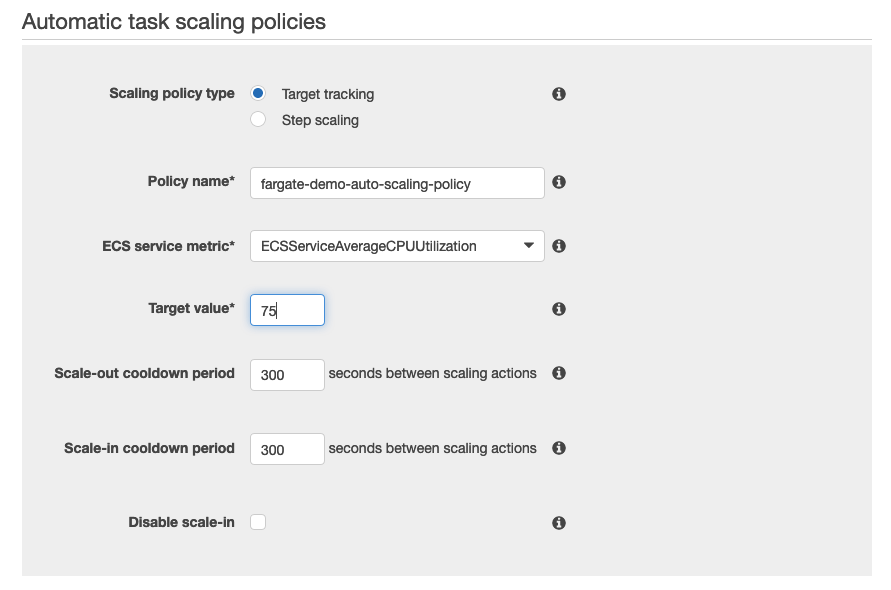
Now the Set Auto Scaling screen is presented. This can be bypassed by selecting “Do not adjust” in the first option, but I’ve described a minimal scaling configuration below:
- Minimum, Desired & Maximum number of tasks: I have set as ‘1’, ‘1’ and ‘3’ respectively. Self explanatory, and configure as your app requires.
- IAM Role: select ‘Create new Role’
- Automatic Task Scaling Policy
- Policy Name: I have named it ‘fargate-demo-auto-scaling-policy’
- ECS Service Metric & Target Value: there are three options here, I have had best experience with sticking with ‘ECSServiceAverageCPUUtilization’ set to 75%
- (See image below.)
- … click “Next Step”
- Review the final configuration and click “Create Service”

In the page to view the Service, after a few minutes the Task will be listed as Running!

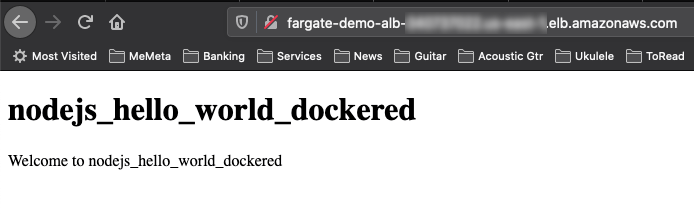
Go back to the AWS Console > EC2 > Load Balancers. In the “fargate-demo-ALB”, grab the DNS Name.

Plug it into your browser and voila, it’s the same hello world app from before we even containerized it.
Final Thoughts and Next Steps
Note that this is only HTTP, your browser will warn that it’s insecure. It’s easy to add a second ALB listener on port 443 and at the same time bring in a certificate from ACM. Then point your Rt53 to the ALB (via alias) and you’ll have your app securely offered over HTTPS!
